SUI Bulletin Board
free demo version
SUI Bulletin Board is a FileMaker template that informs employees, team members and other FileMaker network application users about news, events and other important information.
Customer login
New customer? Start here
SUI Solutions is an independent entity and this web site has not been authorized, sponsored, or otherwise approved by FileMaker, Inc.

Documentation
Preparing SUI User Manager
- Make a list of Roles that will define different user access levels for your solution (ie: Manager, Salesperson, Administrator, etc.) These Roles can match the existing Privilege Set names in your solution.
- Open SUI User Manager.
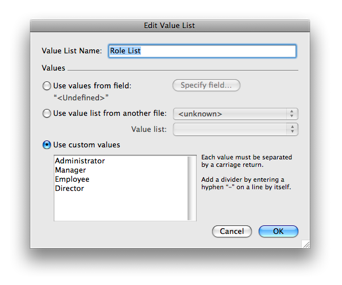
- Go to File -> Manage -> Value Lists… (For FileMaker 8.5: File -> Define -> Value Lists…)
- Edit the value list called Role List. Replace the existing values with your own Roles. Be careful not to delete the Administrator value.
- Save changes and close SUI User Manager.
Preparing Your FileMaker Files
Perform the following steps for each file of your solution.- Open your existing solution file.
- Open the Manage Scripts dialog (For FileMaker 8.5: Define Scripts) by selecting from the menu Scripts -> ScriptMaker…
- In the Manage Scripts dialog box, click Import.
- In the Open File dialog box, find and open the file SUI_User_Manager_v1.0
- In the Import Scripts dialog box, select the script $Account and click OK.
- To map your application Roles to the file’s Privilege Sets, edit the newly imported $Account script.
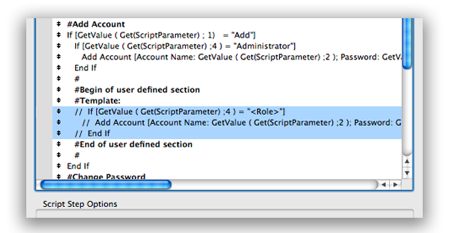
- 7. In the script section between the markers #Begin of user defined section and #End of user defined section make 3 new script steps for each Role you created using the template below, replacing the "<role>" with the actual Role name and "<unknown>" with the actual Privilege Set that the role is mapped to:
If [GetValue(Get(ScriptParameter); 4) = "<role>"]
Add Account [Account Name: GetValue (Get(ScriptParameter); 2); Password: GetValue(Get(ScriptParameter); 3); Privilege Set: <unknown>]
End If
Add Account [Account Name: GetValue (Get(ScriptParameter); 2); Password: GetValue(Get(ScriptParameter); 3); Privilege Set: <unknown>]
End If
Tip: This template already exists in the script in a disabled state. You may just select all three lines, duplicate, enable and modify them.
Repeat Step 7 for each application Role.
Repeat Steps 1-6 for each of your application’s files that you would like SUI User Manager to control.
Note: Sometimes, different Roles should be mapped on the same privilege set. Example: If you have a separate Zip Codes database file with only one privilege set called «Viewer», you can map both application Roles: «Employee» and «Manager» to this privilege set.
Preparing SUI User Manager (Continued)
- Reopen SUI User Manager.
- Create file references for all of your solution files. (Please see FileMaker Help for more details on this step.)
- Go to Scripts -> ScriptMaker… Locate and edit the script called ManageAccountsInFiles
- In the script section between the markers #Begin of user defined section and #End of user defined section add script steps using the template below and replacing the "<unknown>" with a reference to your solution file. Specify only those application files that are with the already imported $Account script:
Perform Script ["$Account" from file: "<unknown>" Parameter: Get(ScriptParameter)]
Repeat Step 4 for each file of your application.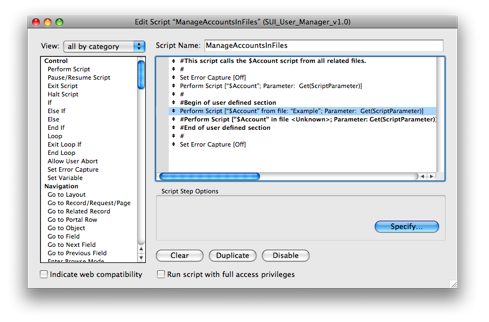
Using SUI User Manager
- To create a new account, open SUI User Manager. Click Add. In the open window, enter the user’s name, login and specify their Role. You can add the user’s e-mail, photo and signature as well. Click Save. The account for this user is created for all files.
- To change a user’s data, open SUI User Manager. Click the green arrow next to the user’s name on the User List. Modify the user’s data and click Save.
Note: When you create a new account with the Administrator role using SUI User Manager, it will be created with the [Read-Only Access] privilege set. You must manually change the privilege set for this account to [Full Access]. This happens because FileMaker does not allow for the creation of [Full Access] accounts programmatically. This type of account must always be created manually.